Zero trust homelab
9 min read
Introduction
As a developer, I have always wanted to create a small homelab where I can play around with different technologies and ideas, but these questions always come up:
- How should I host it in the cloud?
- How can I make it fault-tolerant?
- How can I access it securely?
- How can I back up all my information and restore it reliably?
After some research and a lot of iterations, I would like to share with you my current setup, what trade-offs I made, and what I learned along the way.
Let's start from more generic technical choices and then move to more specific ones. My homelab is hosted on a single AWS EC2 instance, where I run a single-node Kubernetes cluster using k3s. You may ask why I picked Kubernetes instead of just running Docker containers, why I picked AWS instead of DigitalOcean, etc. - there are 2 main reasons:
- The main goal of this project is to become a better professional. That’s why I chose technologies that I use at work and that are widely adopted in the industry. At the end of the day, if a person has strong fundamentals, the exact tech stack they use doesn’t really matter.
- Once you overcome the learning curve, the benefits of using the Kubernetes ecosystem far outweigh the costs. For example, I run my database (only PostgreSQL) directly on the cluster using the CloudNativePG operator, which provides built-in backups & restore mechanisms to a private S3 bucket. Additionally, I use the k8s-monitoring Helm chart to monitor my cluster with Grafana Cloud, which offers a generous free tier and takes care of storing logs, metrics, and traces without extra management overhead.
Architecture Overview
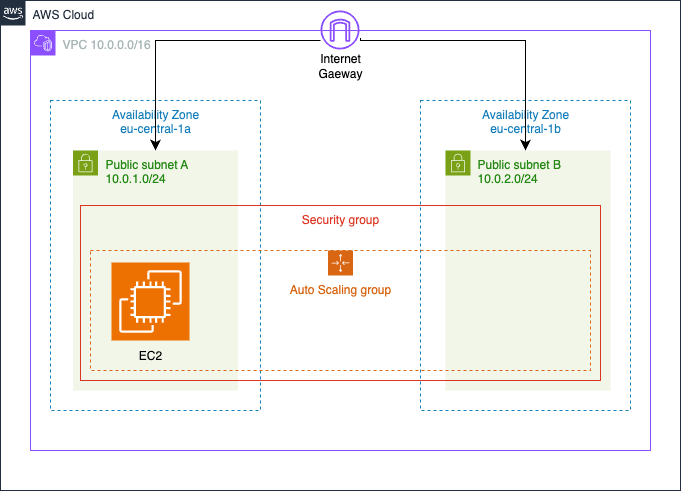 Let's explore the architecture, moving from the overall setup to the individual components. The diagram above shows the high-level AWS view: a single VPC with two public subnets across different availability zones. Inside it, there’s just one auto-scaling group running a single EC2 instance—that’s all. Experienced readers will probably notice a few elements that are missing compared to a typical production environment:
- Where is the Load Balancer that should route traffic to the EC2 instance?
- In the above paragraph, you mentioned that the databases are running on the cluster itself, but the subnets are public, so how is it secure?
- Where are the private subnets and NAT gateway?
Security Group Configuration
All these questions are valid, and I will address them one by one. First of all, I want to show you the security group configuration:
resource "aws_security_group" "asg_sg" {
  vpc_id  = aws_vpc.vpc.id
  ingress = []
  egress = [
    {
      cidr_blocks      = ["0.0.0.0/0"]
      description      = "Allow all outbound traffic"
      from_port        = 0
      ipv6_cidr_blocks = []
      prefix_list_ids  = []
      protocol         = -1
      security_groups  = []
      self             = false
      to_port          = 0
    },
  ]
  tags = local.default_tags
}
As you can see, the security group allows all outbound traffic but denies all inbound traffic. This basically means that no one from the internet can access my EC2 instance directly, so the security concern is addressed. This also removes the need of NAT gateway, which is a paid resource that I want to avoid for cost-saving reasons. But now the big questions arise: how do I expose my services to the internet and how do I access the cluster securely? Well, the rest of the article will be dedicated to answering these two questions.
Exposing Services to the Internet
Let's start with the first question: how do I expose my services to the internet? For everything that needs to be public, I rely on Cloudflare. You probably know Cloudflare for its fast CDN and excellent DDoS protection (with a very generous free tier), but it also offers other free services that fit perfectly in a homelab. The key one I use is Cloudflare Tunnel, which lets you securely expose applications running on a private network without opening any inbound ports. Here’s how it works: you run a lightweight daemon—either directly on your server or as a sidecar container in your cluster—that creates an outbound connection to Cloudflare’s network (it uses WebSockets under the hood). I also manage all my DNS records through Cloudflare and use its proxy feature to route traffic to my services. This setup means Cloudflare handles TLS termination for me as well. Also something that is worth mentioning is that you don't need a reverse proxy like Nginx or Traefik in front of your services, because Cloudflare daemon takes care of routing the traffic to the right service based on the hostname. For example this is my configuration for the Cloudflare Tunnel daemon (cloudflared):
resource "cloudflare_zero_trust_tunnel_cloudflared_config" "cf_tunnel_cfg" {
  account_id = data.terraform_remote_state.prod.outputs.cf_account_id
  tunnel_id  = data.terraform_remote_state.prod.outputs.cf_tunnel_id
  config = {
    ingress = [
      {
        hostname = data.terraform_remote_state.prod.outputs.go_template_hostname
        service  = "http://go-template-svc.${kubernetes_namespace.template.metadata[0].name}.svc.cluster.local:8080"
      },
      {
        hostname = data.terraform_remote_state.prod.outputs.blog_hostname
        service  = "http://blog-svc.${kubernetes_namespace.blog.metadata[0].name}.svc.cluster.local:8080"
      },
      {
        service = "http_status:404"
      }
    ]
  }
}
I map each target hostname directly to its corresponding Kubernetes service. The Cloudflare Tunnel daemon runs as a regular pod rather than as an Ingress or Gateway, making the setup flexible enough to work with Docker Compose or even on a bare-metal server. This approach does have limitations. According to Cloudflare’s documentation, a single tunnel can handle roughly 4,000 concurrent users, and tunnels aren’t recommended for serving large media files such as images or videos—the sweet spot is small to medium REST APIs. To address that, I serve all images and other static assets from Cloudflare R2 buckets. R2 has no egress fees, so I can deliver as much content as I need without worrying about bandwidth costs. You can attach a custom domain to an R2 bucket, which makes it publicly accessible and automatically provides CDN caching, DDoS protection, and TLS termination at no extra charge. Combined with R2's lower storage price compared to AWS S3, this ends up being a very cost-effective solution.
Cloudflare R2 for Static Assets
This is how I configure the R2 bucket for serving static assets:
resource "cloudflare_r2_bucket" "blog_bucket" {
  account_id    = var.cf_account_id
  name          = "${var.org}-${var.blog_db_name}-bucket"
  location      = "EEUR"
  storage_class = "Standard"
}

resource "cloudflare_r2_custom_domain" "blog_bucket_custom_domain" {
  account_id  = var.cf_account_id
  bucket_name = cloudflare_r2_bucket.blog_bucket.name
  domain      = "static.${var.blog_domain}.${var.org}.com"
  enabled     = true
  zone_id     = var.cf_ip812_zone_id
  min_tls     = "1.0"
}
Accessing the Cluster Securely
We've covered how to expose services to the internet. Now let's tackle the second question: how do I access the cluster securely? Since my workloads run on AWS, I can use AWS Systems Session Manager (SSM) to connect to the EC2 instance without opening any inbound ports—a great feature that works out of the box on most Amazon-provided AMIs. But what if you're running on another cloud provider, on-premises, or in a hybrid environment? For this problem I use Tailscale, a mesh VPN built on WireGuard. In practice, this means that every machine you add to your Tailscale network (your tailnet) can communicate securely with every other machine—regardless of NAT, firewalls, or physical location. Tailscale handles all the heavy lifting. This is especially handy for my setup: when I bootstrap the VM running my k3s cluster, I immediately add it to my tailnet. As a result, only devices in my Tailscale network can reach the k3s API server, allowing me to manage the cluster securely from my laptop or any other trusted machine. This approach eliminates the need for a traditional VPN server, HashiCorp Boundary, or any other complex solution. And because Tailscale uses a p2p architecture, traffic flows directly between machines. The only communication with Tailscale’s central service is for authentication, key exchange and certificates—not for the data itself. Well, this solves the problem with accessing the cluster securely from terminal, but what about accessing private graphical applications like pgAdmin, from where I want secure access to my PostgreSQL database? No problem, Tailscale has a solution for that too- tailscale-operator. With it I can run Tailscale directly on my Kubernetes cluster and expose private services as Tailscale "Magic DNS" hostnames. How this looks in my homelab? This is the configuration for the pgAdmin service (standard one, nothing special):
---
apiVersion: v1
kind: Service
metadata:
  name: pgadmin-svc
spec:
  type: ClusterIP
  selector:
    app: pgadmin
  ports:
    - protocol: TCP
      port: 8080
      targetPort: 80
To expose this service through Tailscale, I just have to add Ingress with the following configuration:
---
apiVersion: networking.k8s.io/v1
kind: Ingress
metadata:
  name: pgadmin-ingress
  namespace: databases
spec:
  defaultBackend:
    service:
      name: pgadmin-svc
      port:
        number: 8080
  ingressClassName: tailscale
  tls:
    - hosts:
        - pgadmin
In this way I can access pgAdmin securely from my laptop at the URL https://pgadmin.magic-dns-domain, without exposing it to the internet.
Infrastructure as Code with Terraform
Probably the last thing worth mentioning is that I manage my cloud resources and Kubernetes objects using Terraform leveraging Helm provider. I chose this approach, due to two reasons:
- It is simpler to manage everything in a single place using one tool, instead of using GitOps tools like ArgoCD or FluxCD. For more complex setups, GitOps tools are better fit, but for my homelab this is OK. Who knows, maybe in the future I will switch to Flux.
- When I use Terraform to manage Kubernetes objects, I can dynamically pass auto-generated values from cloud resources to the cluster. This is a feature that is important for me, and I was not able to find a solution for it using ArgoCD or FluxCD. That's why I work on terraform-provider-gitsync - a simple Terraform provider that automatically syncs non-sensitive values such as generated URLs, ARNs, and IDs into a Git repository, storing them in a values.yaml file. If you find it interesting, you can star the repo, it will motivate me to continue working on it.
Conclusion
So this is how I built my fully functional homelab with zero open inbound ports, using a combination of AWS, Kubernetes, Cloudflare, and Tailscale. To summarize, I hope you found this article interesting and that it gave you some ideas for your own homelab. If you have any questions or suggestions, feel free to connect with me on the social media or to write a comment below.
- You can find the source code for this project here.
- Here I recorded a video showing how I deploy this blog application you are reading right now on my homelab so you can see the whole process in action.